


| Designing With Shadow +2+ - no formatting. |
Until the blog formatting fixes itself, I'll be posting this without the formatting for now so it's readable.
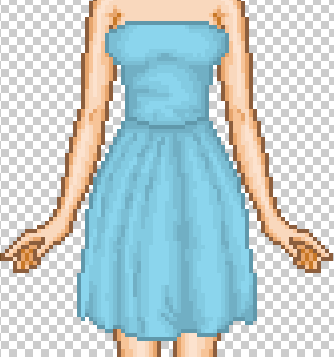
------------------------- Hey there guys and welcome to the second 'Designing with Shadow'!. Within these blogs if you didn't' see the last one. I pick one lucky person to pick the following weeks design and I'll do the design and explain just how do I do, and answer any questions that you may have at the end! This weeks item was picked by TheAsianDoll who picked out a short dress for me to design this week. Now, lets get onto designing! ------------------------------------------------------------------------------------------------------- First thing is first. References. As I asked TheAsianDoll to link me to an item, I'll be using that as my reference for this dress. 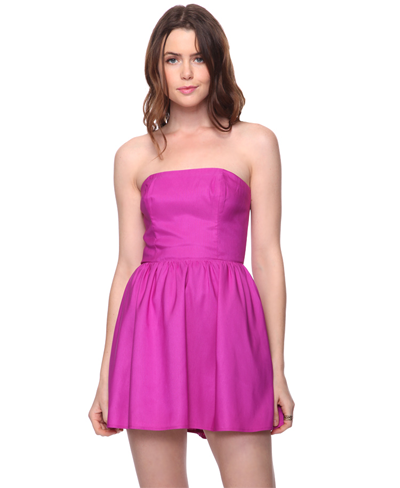 Rather simple no? However the first step to being able to design is understanding how different dresses go, may it be straight or pleated. Now the colour of this dress is rather pink, however because I can, I'll be designing this dress in a pale blue colour but you can use whichever colour you wish to. For the first step, just roughly sketch our your dress design that you want to do, just like with the shirt. At this point we want just a straight bottom, don't start to dent it in here the creases will be. Once you've sketched, just neaten up your line-art and make it 1pixel.
 All sketched out and ready to go! Hope you remember what colour your going to use, because now we're going to start. One thing I do which may be helpful is to get the main colour and then make a line, the base colour in the middle and on the right the darker shades and on the left the lighter, doing this makes sure's the colours are already there. Take your base colour and simple colour in your line-art. 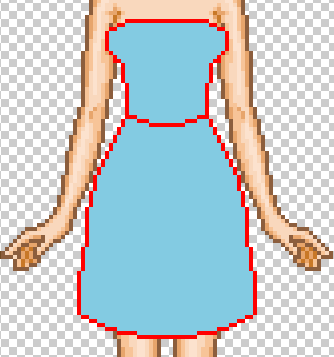 Right, now for the fun part, the start of the shading. Skirts or at least the skirt part of a dress, can be shaded in many different ways depending on the style of it dress/skirt. For this one, instead of the pleats I'm turning it into segmented skirt, so still keeping the pleat idea of the skirt. Simple get your first shading colour (remember that it has to be only 2 shades darker then your base) and start to rough out where you think the pleats should go. Some will go all the way to the bottom, some only part way, some may even go all the way down but have a break in the middle. On one of the creases you'll noticed that I've flared it out a little. This you don't have to do.
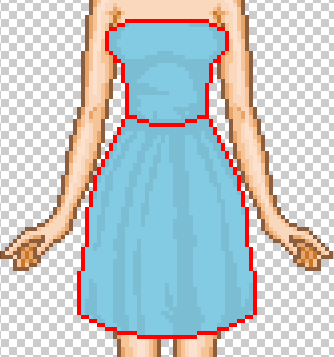 Alright, now we're getting somewhere. Remeber that darkest shading colour that you may of gotten earlier? Remember that it has to be again two shades darker then your first shade. Just like with the shirt one, shade within the darker bits that we've alraedy done. Around the breast area, I've done it slightly different to the shirt. Normally when I would put the darkest colour all the way across under the breasts, I've only done it within the centre. You may choose to do this, however you can still do it all the way across if you like.
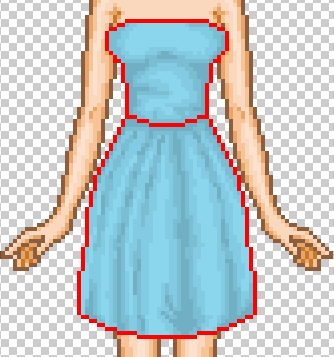 Nearly done now guys! Let's go back to our base colour and now instead of darkening it, we're going to lighten it by two shades. This is our highlight colour and now within the gaps that are remaining that have the base colour, simple now shade within them areas. Don't take up all the area and make sure that some of the base colour still comes through.
And there we have it, all don...wait we're not done again? What is it with me and forgetting these line-arts. Simple get the darkest colour of shade and darken that by about 2-4 shades and replace your line-art with this colour.
 We aren't done there yet with the line-art! Remember that I told you that we wasn't' going to crease the line-art? Well we're going that now using the shading that we've done. In the areas where that you have shaded, simple dent in your line-art slightly within these areas.
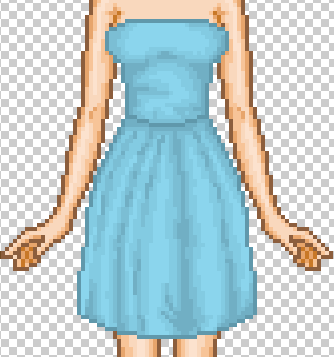
 And there we go. A simple short dress ready to be customized with any pattern or extras that you desire. Don't forget to leave a comment below and you may be able to pick the design to be done next week!
 ---------------------------------------------------------------------------------
Shadow's Extras!
This will be a little corner where I may add extra tips, hints and even feature designs that I've spotted in the forums, so keep your eye out!
This week I've been requested to do a small tutorial on zips. Yes, zips. This was requested by the love Vicingus. Zips are rather simple depending on what you do them. I mostly design zips for stuff like jackets rather then anything else and it's dead simple to do it how I do. Sometimes when doing zippers on jackets, you can do it as either hit-miss or as a gradual zip up the jacket.
On the left we have the hit-miss styled zip and on the right a gradual zip.
 Both zips, but both have a different effect when on the models. With the gradual zip, get a dark grey and then a shade that is a lot lighter. Then simply down where you want the zip to go, to dark, light, dark all the way down to where you want the zip to end. Make sure to cling to the line-art however don't go on-top of it.
  Some zips, such as the Zipper Dress that was created by Vicingus, due to the size can also have a zipper added onto the zip. As you will see throughout the designers, they will do zips differently. As she requested a zip tutorial, I'll use her Zipper dress as an example of how others do their zippers.
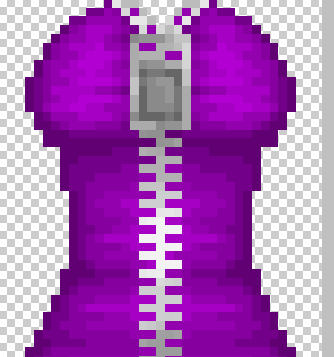 Within her dress, she has done a large zipper which has allowed her to put in a lot more detail then a simple jacket zip like what I do. As you can see, she has been able to do a detailed puller and at the bottom of the dress even a connector. Dresses like this give you the opportunity to really show off your zipper skills, however if you aren't that adventurous like me, then keep to the smaller zips. Sometimes you can shade the zip slightly to it there is a highlight, what I would do is simple lighten up a few pixels in that area by two shades.
And that's about it!
No feature's this week guys. but please keep your designs in the forums and if I spot them, you will be here next week! Cya next time! |


 Anoniem


 0
0 0
0 0
0 0
0


 Speler blokkeren